Student Interactive Edition Feature Guide

Please note: The interface shown in this article will undergo some modifications as we continue to make enhancements to our platform. Contact us at support@perfectionnext.com if you have any questions.
This is an introduction for students on how to navigate Interactive Edition books. Once you have clicked into an Interactive Edition on our platform, you should see something similar to the screen below.
1: Navigation Bar, 2: Title Bar, 3: Sub-Lesson Navigation Bar, 4: Immersive Reader, 5: Notebook 6: Assignment Bar
1. Navigation Bar
The top bar on the page is the navigation bar. It is for navigating the Perfection Next platform rather than navigating within the book, so be aware that clicking any of the tabs on it will take you out of the book view. The left side of the bar shows the name of the book you are viewing.
2. Title Bar
The dark bar below the navigation bar is the title bar. The title bar shows the name of the current lesson you are viewing.
Resources Tab
If you click the word Resources on the right side of the title bar, a dropdown menu will appear with links to any supplemental resources associated with the lesson. Be aware that you may need to click the arrows on the right side of the dropdown menu to reveal all the resources.
3. Sub-Lesson Navigation Bar
The light-colored bar below the title bar is the sub-lesson navigation bar. Use this bar to navigate through the book, as well as through the different sub-lessons within the lesson you are viewing. Note that sub-lessons have their own pages, so you will need to use this bar to find all of the parts of a lesson.
Navigating Through the Book
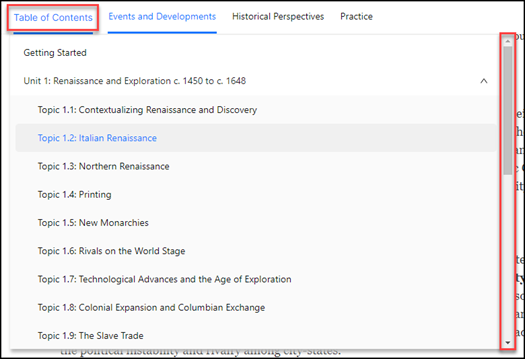
Click the words Table of Contents to open a dropdown menu with all the lessons in the book. Be aware that getting to some of the lessons in the menu may require you to use the scroll bar on the right.
Navigating Through Sub-Lessons
Many lessons contain multiple sub-lessons. Each sub-lesson is located on its own page. You can navigate to the various sub-lessons by clicking the name of the sub-lesson shown in the sub-lesson navigation bar.
When completing assignments, note that each sub-lesson must be submitted individually.
4. Immersive Reader
The icon that looks like a book with a speaker on it is the Immersive Reader icon. Selecting this icon will take you to a distraction-free view of the text with different audio, visual, and translation options. See the Immersive Reader Guide for more information.
5. Notebook
The notebook section on the right side of the page gives you a space to take notes about the text. You can adjust how much space the notebook area is taking up by dragging the gray line with three vertical dots on its left border.
Annotations
You can make annotations in the text by highlighting the text you'd like to annotate and choosing one of the options in the popup menu. From left to right, the options are: highlight, underline, double underline, circle, label, and note. Please be aware that you must click Save to save the annotation. In order to add a label or note, you must first mark the text such as by highlighting or underlining and click Save.
After you make an annotation in the text, it will appear in the notebook on the right. You can add a comment to the annotation from the notebook panel by clicking the pencil icon and then writing in the text field. You can also delete an annotation by clicking the trash icon.
You can also add a note to the notebook that is not associated with an annotation in the text by clicking the Add Note button.
Be aware that your teacher will be able to view your annotations.
6. Assignment Bar
The assignment bar is located at the bottom of the page. You can see your assignment due date on the left side of the bar and you can submit assignments from this bar. You can also exit the assignment and go to your Dashboard by clicking the Exit button.
Completing Assignments
You will be able to complete and submit assignments after your teacher has assigned you that lesson.
As you read through the text, complete any questions you see on the page. After you have completed all the questions on a particular page, the Submit button in the bar at the bottom will become activated. Click the Submit button when you are ready to submit your answers for that page to your teacher.
Note that you must submit each sub-lesson individually. This means that once you submit your answers on one page (sub-lesson), you must go to the next sub-lesson and again fill out and submit any questions. You must click Submit on every sub-lesson.
Related Articles
eBook Feature Guide
eBooks are digital versions of books accessed from the Perfection Next platform. They allow teachers and students to interact with the text, such as by marking important passages, adding annotations, and searching. Please note: There is a difference ...Immersive Reader Guide
What is Immersive Reader? Immersive Reader is a text reader available on Interactive Edition books. It provides a distraction-free view of the text and includes a wide array of accessibility features. Features include: Read-aloud of the text, ...Find Your Student eBook
Follow the steps below to find your student eBook on the Perfection Next platform. 1. When you log in to Perfection Next, you should automatically be taken to the Class Dashboard page. If you are on a different page, click the Dashboard button in the ...Student Login
Follow the steps below to log in to your Perfection Next account. 1. Open your web browser and navigate to perfectionnext.com. 2. The first time you log in to the platform, your teacher needs to either give you a class code or a username and ...
Technical Support
Can't find the solution you're looking for? Contact us for assistance. You can expect a response within 24 hours; we do our best to respond the same day Monday - Friday between 7:30 AM - 4 PM CST.
Customer Experience:
Phone: (800) 831-4190